Here's the two pictures I would like to combine:
A pretty background from the Graphics Fairy... &
A cupcake picture (and I forgot where I got this from, sorry).
Once you're on the homepage of Picnik, click on the Library Tab, then click on "Make a Collage." Of course you'll need to upload your pictures here. You'll note on that on the left hand side you can select from a variety of different collage designs. For simplicity I chose just 2 spaces for this design. Once you've chosen your pictures (just drag and drop which pictures you would like) click done and you're ready to clone!
It will look like this. But remember that you can choose as many pictures as you like.
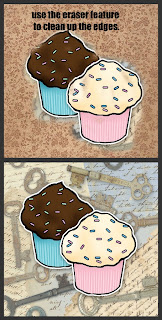
As you can see I want to clone my cupcakes to add to my new background. So, click on the advanced tab at the top of the page and you will see a new menu of items on your left side. The very top one is the cloning feature. Click on the cloning feature and then click on the area of the picture that you want to clone. Next, using your left click on your mouse, add the new picture to the second one (hold left mouse button down and drag on the area of the page that you want to add it to). Note that you can change the size of the brush. Remember too that you can click on "undo" in the right hand corner at any time if you don't like something.I ended up with this
Notice in the top photo how my cupcakes have some of the former background in the new design? No problem! Simply click on the eraser (you can change the size of that too to get into really tight places) and drag your mouse around the areas that you don't want.
So I've cleaned up what I didn't want and I am happy with how my transferred cupcakes look like.
Lastly, click on the edit tab and crop your picture. What do you think????
There is so much you can do with Picnik and they have the greatest fonts that you can add too. So give it a shot, explore, experiment and have some fun.
I would loooovvee to see what you come up with!
I hope this helps, even a little bit.
xoxoxox,
Jacalyn


7 comments:
Oh my gosh, I am so happy you posted this. After your last post, I went in and joined the advance, but had no idea how to clone anything. I played in there for the longest time, but then decided I needed a Clone for Dummies book!!
Thank you Jacalyn so much, Char
Thanks so much for that simple tutorial. I'll have to try it.
a huge Thank You Jacalyn. I went to Picnik yesterday and played around with it before getting your instructions. I didn't do collage first so of course it wasn't working for me. I will play with this over the weekend. This will really help with doing banners for blogs. xoxoxoxoxx
Thank you - I don't have Picnik right now - but if I do I will know where to go! sandie
Very cool, it is so often that there is programs available and you don't even realize it. I have a Mac computer and just figured out it has a program to do this!! I have had the computer for a year
Carol
Thanks so much!!! I have been using picnik and couldn't figure out how to combine two images to over lap. I wonder how you do it with a frame. I was trying to use a cool frame over Graphic Fairy Picture. Thanks so much for sharing.
Here is my latest picnik creation:
http://katspurrfectboutique.blogspot.com/
Thanks, Katharine
My daughter and I when to Doll House to buy a Sherri Lee dress that my daughter was obsessed with. I received no service from the sales staff until I asked. They gave my daughter a few styles to try on when asked what size my daughter would be, she pointed at the dress my daughter had on and said “that size”. I noticed that the dresses had no size tags on them and when I asked the sales staff about that, they got frustrated with me and gave no explanation. So I left the store with a much deflated daughter, went home and ordered the dress online and saved $200.
Post a Comment