Showing posts with label crafting. Show all posts

Wednesday, November 2, 2011

No-Sew Burlap Tablerunner

I have a secret.  Well actually I have many, ha ha, but today I am revealing one:  I can't sew.  Don't judge, don't hate... I. don't. sew.  It's true and I will readily admit it.  I truly envy all the beautifully sewn creations I see out there in blog land.  But, while I have many talents, sewing just isn't one of them.  It is on my very long list of "things to do before I die."

As with many of you, I have fallen in love with burlap.  It all began with my kitchen update to French Country and discover that natural fabrics are part of the decor.  Thus enter burlap.  Hmmm... what can I do with burlap... such a lovely fabric...

 I discovered all sorts of very cool table runners created out of burlap all over blog land and Etsy.  But, most, if not all, involved sewing.  Crap!  Well, never one to be deterred easily, I decided to create my own. 


The first one I made was super simple.  Go to Joanne's, get a few yards of fabric, cut to desired length and width, wash, dry, and iron out the wrinkles.  The washing and drying create awesome fraying which of course we want.  I loved it and it worked perfectly in my kitchen. 

But then I started seeing some more elaborate burlap runners with lace and rosettes.  I love the combination of the burlap and lace but it required sewing.  Or does it?  Not if your brain works like mine!  I. Can. Glue. It!


Now I ask you:  why was fabric glue invented?  For non-sewers right?  Well, maybe not but it works.

What I used:
Burlap fabric cut to about 72" L x 16" W
Vintage Lace
Rosette (I cheated a bit and used some Melissa Frances ones that I had)
Fabric Tac


I discovered that it's really quite easy to fray burlap myself by pulling threads at the ends.  That way I could control how "frayed" I wanted it.  Then I measured my vintage lace and glued it to the ends and also glued the rosette on.  Easy, easy, easy and yet so pretty!


What do you think?  I am in love and it looks fabulous in my French Country kitchen!


Wednesday, April 27, 2011

Cloning with Picnik

After my last post on playing with Picnik a few people asked me to demonstrate how to use the cloning feature on Picnik to blend pictures.  I am more than happy to do so but please remember I am a novice at this but I will show you what I know how to do.  Please note that you must have a premium membership with Picnik to use the cloning feature.  I think it's about 25 bucks a year.

Here's the two pictures I would like to combine:


 A pretty background from the Graphics Fairy... &

 A cupcake picture (and I forgot where I got this from, sorry).


Once you're on the homepage of Picnik, click on the Library Tab, then click on "Make a Collage."  Of course you'll need to upload your pictures here.  You'll note on that on the left hand side you can select from a variety of different collage designs.  For simplicity I chose just 2 spaces for this design.  Once you've chosen your pictures (just drag and drop which pictures you would like) click done and you're ready to clone!
It will look like this.  But remember that you can choose as many pictures as you like.
 As you can see I want to clone my cupcakes to add to my new background.  So, click on the advanced tab at the top of the page and you will see a new menu of items on your left side.  The very top one is the cloning feature.  Click on the cloning feature and then click on the area of the picture that you want to clone.  Next, using your left click on your mouse, add the new picture to the second one (hold left mouse button down and drag on the area of the page that you want to add it to).  Note that you can change the size of the brush.  Remember too that you can click on "undo" in the right hand corner at any time if you don't like something.

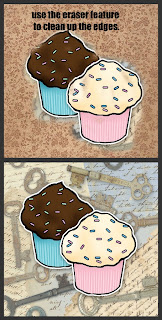
I ended up with this

Notice in the top photo how my cupcakes have some of the former background in the new design?  No problem!  Simply click on the eraser (you can change the size of that too to get into really tight places) and drag your mouse around the areas that you don't want.

So I've cleaned up what I didn't want and I am happy with how my transferred cupcakes look like. 


Lastly, click on the edit tab and crop your picture.  What do you think????

 There is so much you can do with Picnik and they have the greatest fonts that you can add too.  So give it a shot, explore, experiment and have some fun.

I would loooovvee to see what you come up with! 

I hope this helps, even a little bit.

xoxoxox,
Jacalyn

Sunday, April 24, 2011

Fun with Piknic

Am I the last person on Earth to find out how much fun Picnik is?  I have browsed it before but never really did anything with it until the last month or so and yes, I paid for the premium package.  It has a lot of wonderful tools but I know it's not as good as Photoshop.  I actually have Photoshop but it overwhelms me and I even bought a book, ha!  I am more of a visual learner though so I need to take a class and it is on my list of "things to do before I die."

I wanted to make some vintage type labels for my new cleaning products... more on that later. 


I loved these 2 graphics from Dover and the Graphics Fairy so I blended them together to create a label for my kitchen cleanser:

Picnik has a cloning tool which helped me add the flowers to cover up what was in the original label and to add the bird.  I used Marcella Font which I love!  As you can tell I cropped out some of the original picture too.  Since my kitchen is yellow and cobalt blue, this label goes very well!  The tag line "All the Clean You Need" is actual a saying I found on a vintage Tide advertisement.


Here you can see that I added a scrub brush from the picture on the right to the rose label.


Again, I added a wash tub to this graphic with the cloning feature.  I think this might be my favorite.

Just a couple of more examples...


Most graphics are from the wonderful Graphics Fairy, many of whom love her too! 

Some day I will learn to Photoshop but in the meantime I will continue to play with Picnik.

Hugs,
Jacalyn

Tuesday, February 8, 2011

Who needs Pottery Barn?!

WARNING:  This post contains images that some may find disturbing!

I would strongly suggest that if you are an English Teacher or Librarian you just skip this post.  Continue reading at your own discretion.

Please don't hate me...

I just couldn't help myself.  It seemed like such a good idea and it, well, is just so darn pretty!

Please don't judge me...

By now many of you have seen this:


Pottery Barn book stacks - so very pretty indeed.  But $39.95?  A little steep for my budget (someone please tell my hubby to stop laughing....).  I am also sure you have seen the many knockoffs on others' blogs.  Well, what's a girl to do when she so longs for a vintage book stack and loves to craft?  Oh what to do... what to do...

Are you hating me yet?


It seems that I had these books sitting around, lonely and unread or read and discarded.  So I thought I would give them new (old) life.  And, it was super duper easy!


Disclaimer:  I. Am. Not. A. Book. Hater.  I love books.  I love to read.  And, there actually was some hesitation in, er, ripping the covers off of these books.  Like many of you, it has been drilled into my head that books should be respected and cherished.  And I sure do.  Which is why I can't bring myself to buy an e-reader.  I love the feel, the smell, the ambiance of a good book.  But I digress.

Want to make your own vintage stack of books?  Gather up some lonely books or buy some cheapies at your local thrift shop.  For my stack I used 4 books that I had around the house that I had read and no-one else wanted.  I *gasp* ripped the covers off and used distressing ink around the edges to make them appear old.  Next, I printed off a key graphic from the lovely and generous Graphics Fairy and used mod podge to adhere it to the top book.  I had some vintage lace and seem binding which I used to tie the books together.  I finished it off with some vintage keys and paper roses that I had. 


It was so easy and I love the results.  It now resides on the bottom of my end table.

Please don't hate me.  I just couldn't help myself!  And I ask you, who needs Pottery Barn?

Hugs,
Jacalyn

Friday, January 8, 2010

Pink Saturday ~ A Pink Project!

I am so ridiculously excited about the Valentine Swap I joined! This is my very first swap and I just can't wait! I've gathered most of what I need and I know who my swap partner is! I have been stalking, errr... reading her blog to learn more about her. We seem to have a lot in common so I think she will like what I have planned. While I don't want to disclose too much detail in case my partner is reading this, I though I would give you a sneak peak at some of my supplies thus far.

A pretty heart box. I know it's not pink, but it will be!


Some very pretty pink paint, he, he....

Some delightful paper flowers...


How Sweet the Sound for more Pink Saturday Bloggers!

Beautiful light pink vintage lace...


And to close today's preview, how about some lovely pink papers...
There will be so much more but I want to keep this a surprise! Tune in on Valentine's Day and I will give you a view of my finished project. I must admit I am very happy my partner likes pink!

Did I mention I am very excited????!!!!

Happy Pink Saturday!

Jacalyn
PS ~ I forgot to mention that you just must visit Beverly at
Some more pretty pink paper flowers and pink seam binding...

Friday, January 1, 2010

Pink Saturday ~ What I am working on this year!

Happy Pink Saturday everyone! Don't forget to visit Beverly at How Sweet the Sound to see all of the participants this week! We have been asked to share what we are working on or attempting to accomplish this year. Well, I am always mulling over ideas but something that has been in the back of my mind has been to create embellished journals. I am a big fan of journal writing and why not have something pretty to do so?! I actually happened to be working on one when I received Beverly's email with our Pink Saturday topic. Thus, I thought I would share my very first embellished journal. I would truly love some feedback from all of you talented artists out there. I am not a "natural" artist, but boy I sure do try hard! Please remember this is my very first so be kind, LOL!
I know the pics are not the best but I still wanted to share. Of course my first journal is PINK! I also used another favorite theme, cupcakes! I think my therapist persona shows through too because I believe in dreams! No matter your age, income, education, whatever! Dreams keep us motivated and longing for something that we have the power to implement or change! That's part of what life is about I think!
I used lots of vintage items too. Yet another of my passions! You'll note there is vintage ribbon and lots of vintage buttons.

One of my jars of vintage buttons. The jar is vintage too! Go figure!

Here's a picture of the inside cover! I used a vintage inspired image along with some vintage music sheets.
Thanks for taking the time to read my "dream" for this year. Your comments are appreciated!
Hugs,
Jacalyn
Related Posts Plugin for WordPress, Blogger...