Here's the two pictures I would like to combine:
A pretty background from the Graphics Fairy... &
A cupcake picture (and I forgot where I got this from, sorry).
Once you're on the homepage of Picnik, click on the Library Tab, then click on "Make a Collage." Of course you'll need to upload your pictures here. You'll note on that on the left hand side you can select from a variety of different collage designs. For simplicity I chose just 2 spaces for this design. Once you've chosen your pictures (just drag and drop which pictures you would like) click done and you're ready to clone!
It will look like this. But remember that you can choose as many pictures as you like.
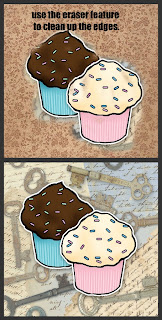
As you can see I want to clone my cupcakes to add to my new background. So, click on the advanced tab at the top of the page and you will see a new menu of items on your left side. The very top one is the cloning feature. Click on the cloning feature and then click on the area of the picture that you want to clone. Next, using your left click on your mouse, add the new picture to the second one (hold left mouse button down and drag on the area of the page that you want to add it to). Note that you can change the size of the brush. Remember too that you can click on "undo" in the right hand corner at any time if you don't like something.I ended up with this
Notice in the top photo how my cupcakes have some of the former background in the new design? No problem! Simply click on the eraser (you can change the size of that too to get into really tight places) and drag your mouse around the areas that you don't want.
So I've cleaned up what I didn't want and I am happy with how my transferred cupcakes look like.
Lastly, click on the edit tab and crop your picture. What do you think????
There is so much you can do with Picnik and they have the greatest fonts that you can add too. So give it a shot, explore, experiment and have some fun.
I would loooovvee to see what you come up with!
I hope this helps, even a little bit.
xoxoxox,
Jacalyn


